Tuesday, December 14, 2010

The end of 2010 is approaching fast

Time flies, and 4 months into the blogging game I finally passed the 1000th view this week *Hurray*
After some busy periods throughout the year things are finally falling back into a routine, and blog posts are popping up a bit more regularly. I have also been spending quite a lot of my spare time training for another newer aspect of my life MTB racing. Which in 2010 has taken off with me racing in over 25 races this year, including some good results.

Tomorrow night we have the annual REVIC - Revit Users Group of Victoria Xmas party. This is the 3rd year now we have run it at Rydges just outside the city, on the pool deck. The weather is looking perfect with a nice afternoon forecast for some networking, drinks & slideshows of users work from the year


Rydges Pool Deck

We ran a internal competition in our office to encourage images from the year, which turned out to be a great way to get everyone invovled. Of course most people left it until 30minutes before the set deadline to ask for some last minute tips!
 We invited the entire office to vote, and ended up with a good spectrum of the office getting involved and voting. It was interesting to see the results, and see what impresses each group of people. Most are impressed by realistic renders, but it was good to see some non Revit people impressed by detail views of complex modelling and even extracts of 2D presentation drawings
Winning Entry
The winning entry was a collection of renders on a few theatre projects and a public building, which was well put together
Heres a quick collage of some of the images put forward for the Revic Xmas Slideshow

So to all those who are finishing up for the year in the next few weeks, have a great Xmas and a relaxing new year

Monday, December 13, 2010

New Revit Forum

I was hoping it didn't come to this, but I have officially signed up with a new Revit based forum group "Revit Forum"


http://www.revitforum.org/
 
With the ongoing saga at AUGI, some forward thinking (and some upset) ex(?) AUGI contributors have setup a REVIT specific forum site

Based on a very easy to use vBulletin format forum engine, you can easily setup RSS readers and the like and even use something like Tapatalk iPhone which is pretty neat

Who knows where it will go from here, and whether AUGI will resurface in anything close to its previous form

But there are already some notable minds adding their thoughts over at Revit Forum, with close to 100 users and 500 posts in its first week things are starting pretty quickly

Defiantly worth checking out and signing up

Structural Families - Categories & Parameters - "Show family pre-cut in plan views"

Following my recent post on Structural Family settings here is my next post on the topic

Another commonly misunderstood setting is "Show family pre-cut in plan views"'

This setting applies to both Framing & Column families.

Framing Families
The setting is fairly obvious for framing families, it is basically a setting that allows you to control how a raking beam will display when it continues above the cut plane

Frame Example


Plane view in fine detail level
Side Note:
No matter the setting, if a beam continues below the cut plane, it will be shown to its full extent. This is an area that newer users struggle to remember with Revit. The same goes for floors/ramps, stairs etc. Revit will only cut an element continuing above the cut plane and simply show whatever is below to the bottom of the element

Stairs are the best example to explain this. In the image above the situation is clear, no matter how we configure the view range at the top level we see the stair all the way to the bottom.

The same goes for structural framing, if the beam passes through the cut-plane we will see the beam until the bottom. This setting just allows us to control weather the beam is also shown all the way to the top


Column Families

But when we get to the "Show family pre-cut in plan views" setting for column families things become a little less clear


This is how Autodesk describes the setting for columns:

Extract from the 2011 Help file :
Unchecked:
When loaded into a project, if you want the column to display in plan view based on the cut plane of the project’s plan view

Checked: 
Consistently, regardless of the cut plane of the project’s plan view

This is correct for plan views, but what if you want to take a callout of a column or cut a detail section from a section. With the option checked, the column will only display up to the cut plane level in the family file.

Example of problem with "Show family pre-cut in plan views"

So we could push up the cut plane in the family, but if you are talking about a straight forward column you would be best to just turn off the setting.

The setting is only really useful for complex column shapes where you want the column to always display as per the plan view in the family

But be aware that all OOTB (out of the box content) are set with this setting, and that all standard templates are preset with this setting as well

Defiantly one to look out for, and if you are running custom content in your office, consider unchecking the option if you haven't already. It will save some people some time if they come across this problem on a project


Thursday, December 2, 2010

AUGI........where have you gone?

So I have been trying to get onto AUGI since Wednesday and it finally opens up the forums this afternoon and all is now clear.

AUGI as we know it is currently off the web. And all previous threads a gone, temporarily or not that is one scary thought!

Not just for Revit users, but for all users. Particularly AutoCAD. There was years of information stored in those forums. And when a problem occured with any Autodesk product, I would generally go to AUGI before I go to Autodesk support


This thread speculates what has happened, but it appears to be a problem with the old ISP
http://forums.augi.com/index.php/built-to-last/viewthread/83/

Hopefully they can retrieve and reinstate all the old threads

Either way my vast collection bookmarked threads will be useless I am guessing!

Friday, November 19, 2010

Resetting the User Interface in Revit 2011

If you have ever had a user stuff around with the ribbon in 2010 or 2011 you may have already worked out a way to reset the User Interface (UI) or you may have just manually put everything back where you found it

But Revit keeps these settings in the UIState.dat file which is stored in a secret hidden place where windows doesnt want you to find it.

If you couldnt find it here is the location;

Windows XP
%USERPROFILE%\Local Settings\Application Data\Autodesk\Revit\Autodesk Revit {Product Name} 2011 
Windows Vista


%LOCALAPPDATA%\Autodesk\Revit\Autodesk Revit {Product Name} 2011

Once you find the file all you need to do is delete/rename/move the file and Revit will recreate it from the default settings when it opens Revit again

There must have been a number of people asking how to reset the UI because Autodesk has now released a script which will basically do the above for you, you can find the script here

http://usa.autodesk.com/adsk/servlet/ps/dl/item?siteID=123112&id=14880949&linkID=9243099

Another tip is you can copy a UIState.dat file into the location of each user which will setup that user with quick access toolbars, any ribbon customization etc. If you combine this with a copy of the office Revit.ini file you can setup workstations pretty quickly without even opening Revit!

Certainly one to be careful with, and be particularly careful of build numbers, as I have seen UIstate.dat files causing problems if the build isn't consistent

Monday, November 15, 2010

Structural Families - Categories & Parameters - Beam cutback in plan

I recently gave a talk at REVIC (Revit Users Group of Victoria) on Structural families, where I talked quite broadly about structural families and the settings available which affect their display in the project. It required a quick refresh for myself when preparing in some areas for settings which are not commonly used.

In the next couple of posts I will investigate in more detail or explain a few of the settings less commonly used and known

One of the settings specific to the the Structural Column Family is the checkbox "Beam Cutback in Plan"

Sounds quite straightforward, but it actually only applies to the symbolic line for the beam in plan

The two options we have are;

  • From Geometry
  • From Bounding Box

Symbolic linework with the two options
So checking the option "From Geometry will only take the Symbolic line through to the column and it will leave the model geometry unchanged

Regardless of the cutback option you choose, your 3D geometry wont change

In most cases this is fine, you dont need the beam geometry to continue through to the column web

But if you do need to model the beams accurately with a set distance straight from the column web, you will need to start playing around with the beam family and the start and end extensions

More Family settings soon...


Monday, November 8, 2010

Weird Revit - Projection lines non-bearing walls

So I get a curveball late last week that has me thinking, and turns out to be one of those weird Revit things.

Concrete GA plan, with plenty of hidden lines for slab folds and beams etc. So we are set to Structural discipline. But this particular job has a lot of structural walls which are to be concrete, and then a lot of facade brickwork walls.

Our clever Revit worker, puts the non-structural walls onto a structural usage of non-bearing. And models away, but after a few days he models some more walls and they don't show up in the same plan.

After some quick investigation I am stumped, why are some walls showing and not others. They have almost identical properties, and they are in the view range. If I change the plan view properties to Co-Ordination they show up but then I loose my beam and slab hidden lines.

So I look into the view range again, the walls showing up happen to be in that dead zone between the bottom primary range, and the view depth.


Defiantly one to keep in mind!

Friday, November 5, 2010

Project Bluestreak - How do you turn it off??

So I saw the release of the new LABS application Project Bluestreak last week.

Autodesk Project Bluestreak LINK

I already use an open source IM program that works pretty well, but I thought I would at least test out this new add-on

The first problem is noticeable straight away, SETUP

Bluestreak is not integrated into Revit like the worksharing monitor already is. You physically have to setup a project group for each project you want to use it on. You also need each user to create an account which isnt too lengthy of a process but is a bit of a pain to be honest.

I see exactly where this is going, and it is a really useful looking tool for large projects using the new Revit Server tool

But for the average office, we really only want something like the worksharing tool with a IM facility for relinquishing and granting requests

So I spend 30 mins playing around with it, then I try to turn it off

I cant! And there is no entry in the INI file either. I logged a question at the aptly named GetSatisfaction website setup for bluestreak. And it seems the only way to turn it off is to completely uninstall it. Otherwise for each STC you get 3 warnings (which seems to stop the sync process until you acknowledge them) that say "Failed to share activity with Bluestreak"

 So I worked all day Friday with this annoying message each time I saved, first thing Monday morning I am uninstalling. Promising idea, but defiantly needs a bit of work

Tuesday, October 19, 2010

Model Cleanup - Issue to consultants

A new project arrived in the last week, more and more Revit collaboration projects are coming through which is great

I know myself, when I am initially starting out collaborating with a new consultant, things are usually a little on edge until protocols are worked out and established, until everyone gets comfortable on what they expect and what is expected. So I might be a little bit extra diligent with things like model clean-up prior to sending

So the project we received this week was not expected to be a large project, and will probably be for us less than 10 sheets. It took a little while to receive the model and it arrived sometime after on CD couriered over. Receiving these models sometimes can be quite exciting, not knowing what will be in the model! But before even saving from the CD the first thing I notice is the file size. Over 150mb, wow!

So of course I did some investigation, first thing I looked at was the sheets, maybe there was more than just what I expected to be in the model. You get a feel for file size based on the amount of information shown on sheets. But nothing exciting there were only 25 odd sheets in the file

Step two for me in this case, was to check design options, particularly early in a project there may be entire other buildings and schemes hidden away in the model. But no not a single design option

Next step, was purge unused, on the manage panel for those who have lost it :)

Straight off, it took a good 10 minutes to compute, over 1000 unused elements! There is the problem!

So once the file was purged, then compacted. We had it down to 50mb, which when linked into a model along with other models like and MEP model can really make a difference to performance.

The general rules I would follow and encourage others for issuing models are;

Essential
  • Detach from central and save the file somewhere on your system, it will still have to be detached at the other end, but to ensure you don't accidentally save any cleanup back to the central it just makes sense
  • Review warnings and minimize where possible
  • Purge unused, this is a must at the start of the project when there may be extra template junk
  • Compact the file once purge is complete
Some examples of Project Specific Cleanup
  • Remove design options if irrelevant to other consultants
  • On larger projects, delete working views
Any other suggestions for good practice when issuing models?

Thursday, October 14, 2010

Revit Technology Conference 2011 - Abstract Submisson

Just a reminder to all that abstract submissions close next Friday (22 October 2010) for next years RTC conference to be held on the Gold Coast over the weekend of 26 – 28 May


As usual I will be putting mine together at the last minute no doubt, but plenty of time to prepare for the actual event!

I would encourage everyone to consider putting forward something, and to lock the date into their calendar as each year this event just gets better and it really cant be missed

All the details are on the website

Monday, October 4, 2010

Watch-it - Rotate with no base point

A real head scratcher came up today, a user couldn't position a rotation base for any elements in a view

Normal rotation graphics showing basepoint

Screenshot of rotation with no basepoint, notice just a line with no arrow at the centre
After some initial investigation it still had me stumped, but I was sure it must be a visibility setting

After a good while more of investigating, Turns out the rotation base is actually related to you're current workset, and if that workset is turned off in the view you are trying to rotate the object in, you will not get a rotation base

The fix was to change to a suitable workset that is present in the view. Probably not something that would come up very often, but defiantly one to watch for!

Wednesday, September 29, 2010

Workflows - Tag all not tagged - Structural Columns

One of the more useful workflows is the Tag option - "Tag all not tagged"

Particularly for structural columns, however on a general arrangement plan you will mostly likely only want the column over tagged. Even if the column under is the same mark, you certainly dont want two identical tags in the same spot

Here is a short video of the workflow I would suggest


To confirm the steps
1. Select the desired objects to be tagged in 3D view (much easier to see what you are selecting)
2. Switch back the plan view maintaining the selection
3. Tag all not tagged, making sure you choose the current selection option
4. Done!

Too easy...

Monday, September 20, 2010

Phasing for Structure - Hidden Lines

Early on with my Revit learning I discovered phasing, initially with topographys & site pads which then proved to open another entire host of learning and questions, and then I quickly found the power of phasing for modeling and representing existing structure

A great number of structural people I talk to know little about phasing, and this leads me to believe not many structural people are taking advantage of the feature.

With RTC 2011 abstract submissions coming up I am seriously thinking about submitting a talk on Phasing for Revit Structure

But in the mean time here is a tip which should help a few structural people

Straight out of the box, Revit's phasing setup is not all that helpful and descriptive with a confusing amount of information presented at first in the phasing settings

One of the problems you will run into with phasing for structural elements is the representation of hidden lines for existing structure when displaying the existing elements with graphic overrides with phasing

To get around this the you need to change the Graphic override for existing projection lines circled in red in the image below

Phasing settings dialog under mange panel

By default the setting will override your linetypes for all existing lines to "Solid" meaning  no hidden lines will show for structure under

You will need to change the linetype to" No Override"

Saturday, September 11, 2010

Cant add cloud to an Issued Revision


I have lost count long ago the number of times I have been asked about this error dialog

The error is a bug really, and was present up until the 2011 release. It is essentially Revit not automatically ticking over to the next available Revision when the previous Revisions have been checked as "Issued"

Revisions Dialog
Once the last created revision cloud has been "Issued" you would typically create a new revision, if you then go to create your revision cloud on a sheet you would receive the error. This led a number of people to just not using the issued check box. But anyone who has used revisions on projects with a long and complicated revision history would know that it can become complicated very quickly and hard to keep track of what has been issued and what is currently in progress

To avoid the error the following steps should be followed;

1.  Add your new revision in the revisions dialog under the view panel

2.  Goto any sheet you wish to place a revision and start the cloud

3.  While still in the Revision command goto the Revision Cloud properties
Revision Cloud Properties


 4.  Set the desired revision


5. Go back to the revisions dialog under the view panel and issue the previous revisions

And keep in mind if this process hasnt been used on the project, you may have to go back and uncheck all the previous revision to make the new revision current

 Setting the revision in the cloud sketch mode (steps 3 & 4) is the key step, it does not seem to set the default revision otherwise and will not work if you simply change the revision after finishing the step as the next time you start the cloud it will just use the last cloud set within the cloud sketch mode

The bug is all fixed in 2011, and even if you issue all revisions checked as issued you now get a straightforward and obvious error warning

2011 Revision Warning
Now my only wish is that we could start clouds without already assigning a revision which would be great for highlighting areas and having a sheet ready for issue before we know when it will be issued

Happy Reviting

Thursday, September 9, 2010

3D in 3D!

I received an interesting package today from my software reseller, a set of 3D glasses reminiscent of the 80's. Cardboard frame, one red one blue lense

Ever since the huge success of Avatar earlier in the year, 3D has been a huge marketing point for everything from movies to sport broadcasts

Earlier in the year we were asked to submit some project images for a client showreel our reseller puts together, these things tend to take some time to develop to a point you are happy with so I submitted one project along with the original model to the reseller

They ended up creating a interesting little showreel of flythroughs which are actually in 3D when viewed with the supplied glasses

Screenshot of our Project Submission
Interesting concept and I definatly got some strange looks in the office while wearing the glasses watching a 3D showreel in 3D!

Checkout the website here for more details

Sunday, September 5, 2010

Current challenges

Back again with my first actual post

Things are currently pretty busy with a number of challenging projects on the go

One Particular project has been particularly challenging with a very interesting transfer structure which is dictated by the existing building below which we are building over, requiring us to transfer our perimeter columns from quite a few levels above!

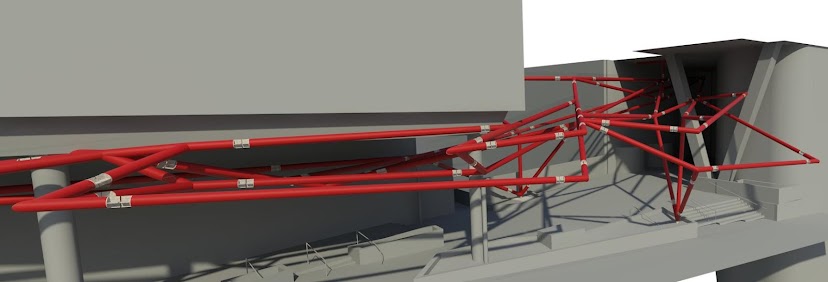
Here is a image of the current transfer option which is being proposed

Transfer Structure

The current scheme will have an exposed steelwork finish, the issue with this has been fire rating the support of the columns. To achieve this we have box girders which are formed by two 800mm deep girder beams with a concrete beam between the two beams at each column line.

Box Girder Section

Fairly easy to model, but with the repetitive nature of the beam and the fact that the design is constantly being refined an adaptable family was the way to go. With the main problem having the layout reflected on plan accurately but clearly

Example of plan representation
After a few attempts at different approaches, I ended up with a standard structural framing family with each of the elements as a line-based generic model component set to structural framing. The benefit of this approach let me have the concrete infill element the coarse display outline and the steel members either side only show in medium and above (and 3D) Having them as lined based families really gives you much better control of the extent of the elements particularly when working with nested families.

Box Girder Beam Family

Both families were nested as shared allowing individual scheduling as required. Having them nested also allowed me to set each family to its appropriate material type under family category and parameters in the original family settings ensuring they show correctly on plan. The steelwork beams once nested also cut back nicely at support ends. For the concrete element I extended to ensure no cutback which ensures the ends trim nicely at supports and it also allowed me to cut by face where required at the curved column locations without affecting the steelwork


Example at support location
Once setup it has been very easy to modify the size with a type catalog linked for adjusting the steelwork and parameters to adjust the overall spacing of the beams. Each beam location seems to require a different geometry at this stage so the parametric family has been crucial

Another interesting aspect of the transfer structure has been the inclined wishbone columns. I have always approached inclined columns with specific families as even with 2010 I found the slanted system family columns hard to maintain, although 2011 is quite a bit better

Inclined Wishbone Column
The main challenge with this column is that the actual proposed split location on the column needed to be adjustable above the base level

Adding parameters for this one is fairly easy

Wishbone Column Family
The main key to creating this type of column family is to get the constraints to the reference line family which will be used to host the sweep for the column.


With a little research and setup things are going smoothly and having the ability to quickly adjust layout and geometry has been invaluable while still maintaining the accurate &  readable linework plan

It has certainly be fun to work on! Let me know if you would like any more details

Cheers

Ben

Saturday, September 4, 2010

Welcome to my New Blog

After many thoughts of starting my own Revit blog finally I took the step

If you dont know me, I am currently working for a large Consulting Engineering firm in Melbourne, Australia. Managing an established team of 15 Revit Structural technicians working with a team of 30 design engineers on every project type imaginable including our first baby a $900million hospital which is now fully completed onsite. I am also spending some time helping out our MEP guys who are entering the next phase of their implementation process of Revit which is exciting times finally having a fully integrated building model to work with.

Some exciting things happening, new projects new experiences which I hope to share here on this blog

So back soon with some info on what is happening at the moment